FT2232SPI Programmer: Difference between revisions
m (openmoko: correct wrong pdf link syntax) |
|||
| Line 220: | Line 220: | ||
= Openmoko = | = Openmoko = | ||
The openmoko debug board(which can also do serial+jtag for the openmoko phones, or for other phones) has [http://people.openmoko.org/joerg/schematics/debug_board/OpenMoKo_Debug_Board_V3_MP.pdf | The openmoko debug board(which can also do serial+jtag for the openmoko phones, or for other phones) has [http://people.openmoko.org/joerg/schematics/debug_board/OpenMoKo_Debug_Board_V3_MP.pdf its shematics available here] | ||
== Informations == | == Informations == | ||
Revision as of 14:58, 23 January 2017
Recent versions of flashrom support the -p ft2232_spi (or -p ft2232spi in older flashrom revisions) option which allows you to use an FTDI FT2232/FT4232H/FT232H based device as external SPI programmer.
This is made possible by using libftdi. flashrom autodetects the presence of libftdi headers and enables FT2232/FT4232H/FT232H support if they are available.
We currently know of the following FT2232/FT4232H/FT232H based devices which can be used as SPI programmer together with flashrom:
DLP Design DLP-USB1232H
The DLP Design DLP-USB1232H (datasheet) can be used with flashrom for programming SPI chips.
Sidenote: The module can also be used as JTAG programmer with OpenOCD support.
Where to buy: Digikey, Mouser, Saelig
Setup:
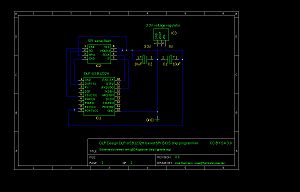
In order to use the DLP-USB1232H device as SPI programmer you have to setup a small circuit (e.g. on a breadboard). See the schematics for details (you can also download the schematics as PDF for easier printing).
What you will need:
| Quantity | Device | Footprint | Value | Comments |
|---|---|---|---|---|
| 1 | DLP Design DLP-USB1232H | — | — | ... |
| 1 | Breadboard | — | — | ... |
| many | Jumper wires | — | — | ... |
| 1 | DIP-8 SPI chip | — | — | This is the chip you want to program/read/erase. |
| 1 | 3.3V voltage regulator | TO-220 | 3.3V | E.g. LD33V or LD1117xx. |
| 1 | Electrolytic capacitor | single ended | 100nF | ... |
| 1 | Electrolytic capacitor | single ended | 10uF | ... |
Instructions and hints:
- You must connect/shorten pins 8 and 9, which configures the device to be powered by USB. Without this connection it will not be powered, and thus not be detected by your OS (e.g. it will not appear in the lsusb output).
- You need a 3.3V voltage regulator to convert the 5V from USB to 3.3V, so you can power the 3.3V SPI BIOS chip.
- You can probably use pretty much any 3.3V voltage regulator, e.g. LD33V or LD1117xx. For usage on a breadboard the TO-220 packaging is probably most useful.
- You have to connect two capacitors (e.g. 100nF and 10uF as per datasheets, but using two 10uF capacitors, or even two 47uF capacitors also works in practice) as shown in the schematics, otherwise the voltage regulator will not work correctly and reliably.
- Connect the following pins from the DLP-USB1232H to the SPI BIOS chip:
- 18 (SK) to SCLK
- 16 (DO) to SI
- 2 (DI) to SO
- 5 (CS) to CS#
- The WP# and HOLD# pins should be tied to VCC! If you leave them unconnected you'll likely experience strange issues.
- All GND pins should be connected together (pins 1 and 10 on the DLP-USB1232H, pin 8 on the SPI chip, pin 1 on the voltage regulator).
You have to invoke flashrom with the following parameters:
$ flashrom -p ft2232_spi:type=2232H,port=A
On older flashrom versions the syntax was:
$ flashrom -p ft2232_spi:ft2232_type=2232:port=A
Photos:
-
Module, top
-
Module, bottom
-
SPI header on a mainboard
-
Module on a breadboard, connected to the mainboard's SPI header
-
Breadboard setup
-
Another breadboard setup
-
Module and parts
FTDI FT2232H Mini-Module
The FTDI FT2232H Mini-Module Evaluation Kit (datasheet) can be used with flashrom for programming SPI chips.
Where to buy: FTDI
FTDI FT4232H Mini-Module
The FTDI FT4232H Mini-Module Evaluation Kit (datasheet) can be used with flashrom for programming SPI chips.
Where to buy: FTDI
openbiosprog-spi
openbiosprog-spi is an Open Hardware USB-based programmer for SPI chips, designed by Uwe Hermann. It uses an FTDI FT2232H chip and features either a DIP-8 socket or a pinheader where jumper-wires can be attached. The user-space source code is part of flashrom, the schematics and PCB layouts are licensed under the CC-BY-SA 3.0 license and were created using the open-source Kicad EDA suite (GPL, version 2).
For more information and downloads, including a parts list, Gerber file downloads, recommended Kicad settings, and recommended PCB manufacturer settings, see http://randomprojects.org/wiki/Openbiosprog-spi.
Usage:
$ flashrom -p ft2232_spi:type=2232H,port=A
Photos:
-
Chip in DIP-8 socket
-
Device with pin-header
-
Bare PCB, front
-
Required parts
-
Schematics
-
PCB layout
RushSPI
RushSPI is an Open Hardware USB-based programmer for SPI chips, designed by Nikolaj Schlej.
It uses an FTDI FT232H chip and features a DIP-8 socket and a pin header. The user-space source code is part of flashrom, the schematics and PCB layouts are licensed under the CC-BY-SA 3.0 license and were created using the open-source Kicad EDA suite (GPL, version 2).
For more information and downloads, including schematics, parts list, Gerber files, etc. see http://randomprojects.org/wiki/RushSPI.
Usage:
$ flashrom -p ft2232_spi:type=232H
Photos:
-
RushSPI v0.1
Amontec JTAGkey/JTAGkey2/JTAGkey-Tiny
The Amontec JTAGkey2 can be used with flashrom for programming SPI chips. JTAGkey and JTAGkey-Tiny should work, if you add them to ft2232_spi.c (untested).
Where to buy: Amontec eShop
Usage:
More info can be found on on the JTAGkey site.
- You need a 3.3V voltage source - see above for details.
- Connect the following pins from the JTAGkey2 to the SPI BIOS chip:
- 1 (Vref) to VCC
- 5 (MOSI/TDI) to SI
- 7 (CS#/TMS) to CS#
- 9 (CLK/TCK) to SCLK
- 13 (MISO/TDO) to SO
- 20 (GND) to GND
- The WP# and HOLD# pins should be tied to VCC.
The "Cable pinout" picture below shows the colors on the breakout cable.
Photos:
-
Amontec JTAGkey2
-
Cable pinout (click for larger image)
-
Amontec JTAGkey-tiny
Olimex ARM-USB-TINY/-H and ARM-USB-OCD/-H
The Olimex ARM-USB-TINY (VID:PID 15BA:0004) and ARM-USB-OCD (15BA:0003) can be used with flashrom for programming SPI chips. The ARM-USB-TINY-H (15BA:002A) and ARM-USB-OCD-H (15BA:002B) should also work, though they are currently untested.
The following setup can then be used to flash a BIOS chip through SPI.
On the ARM-USB-TINY, VREF, and VTARGET are internally connected, and all the GND lines (even numbered pins, from 4 to 20) share the same line as well, so they can be used to split VCC/GND between the voltage source and the target.
The voltage source should provide 3.0V to 3.3V DC but doesn't have to come from USB: it can be as simple as two AA or AAA batteries placed in serial (2 x 1.5V).
Invoking flashrom:
You first need to add the -p ft2232_spi option, and then specify one of arm-usb-tiny, arm-usb-tiny-h, arm-usb-ocd or arm-usb-ocd-f for the type. For instance, to use an ARM-USB-TINY, you would use:
$ flashrom -p ft2232_spi:type=arm-usb-tiny
Openmoko
The openmoko debug board(which can also do serial+jtag for the openmoko phones, or for other phones) has its shematics available here
Informations
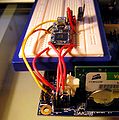
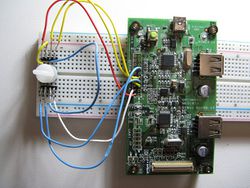
The openmoko debug board can act as an SPI programmer bitbanging the FTDI(no need of an openmoko phone), you just need:
- a breadboard
- some wires
- The openmoko debug board(v2 and after,but only tested with v3)
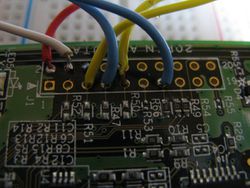
The voltage is provided by the board itself. The connector to use is the JTAG one(very similar to what's documented in the previous section(Olimex ARM-USB-TINY/-H and ARM-USB-OCD/-H )
Building
WARNING this was tested with 3.3v chips only...
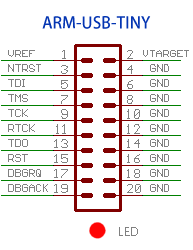
Here's the pinout of the JTAG connector of the openmoko debug board(copied from ARM-USB-tiny because it's the same pinout):
- Also connect the BIOS chip's write protect(WP) to VCC
- Also connect the BIOS chips's HOLD to VCC
Pictures
- Pictures
-
-
-
Performances
# time ./flashrom/flashrom -p ft2232_spi:type=openmoko -r coreboot.rom
flashrom v0.9.5.2-r1545 on Linux 3.0.0-20-generic (x86_64)
flashrom is free software, get the source code at http://www.flashrom.org

Calibrating delay loop... OK.
Found Winbond flash chip "W25X80" (1024 kB, SPI) on ft2232_spi.
Reading flash... done.

real	0m19.459s
user	0m1.244s
sys	0m0.000s
# time ./flashrom/flashrom -p ft2232_spi:type=openmoko -w coreboot.rom
flashrom v0.9.5.2-r1545 on Linux 3.0.0-20-generic (x86_64)
flashrom is free software, get the source code at http://www.flashrom.org

Calibrating delay loop... OK.
Found Winbond flash chip "W25X80" (1024 kB, SPI) on ft2232_spi.
Reading old flash chip contents... done.
Erasing and writing flash chip... Erase/write done.
Verifying flash... VERIFIED.

real	1m1.366s
user	0m7.692s
sys	0m0.044s
Advantages/disadvantages
- fast(see above)
- easily available(many people in the free software world have openmoko debug board and they don't know what to do with them), can still be bought
- stable
- SPI only


